Introduction
Embarking on a journey into the world of 3D printed drones, I decided to push the boundaries of my previous foam-based builds by exploring the flexibility and customization offered by 3D printing technology. In this blog post, I’ll walk you through my experience of printing, and assembling my first 3D-printed drone.
As someone passionate about VTOL (Vertical Take-Off and Landing) drones, I was drawn to the myriad of design possibilities that 3D printing could unlock, allowing for tailored modifications and unique configurations.
The technical challenges I encountered ultimately led to a deeper understanding of this exciting technology. Whether you’re a seasoned drone builder or a curious hobbyist, I hope my journey provides insights and inspiration for your own projects.
Choosing an Airframe
I am primarily interested in VTOL airframes, and at some point, I would like to design my own. My current goal is to become comfortable operating and making modifications to an airframe based on an existing 3D-printable design. I have previously built a 2+2 Tiltrotor (2 lift motors and 2 tilt motors) foam-based drone, and now I’m keen to experiment with tilt-tricopters and tailsitters.
I found several commercial and open-source options for 3D printable VTOL models. The most interesting commercial options to me were from Eclipson, Flightory, and Titan Dynamics. I also liked the eXplora VTOL an open-source tail sitter design.
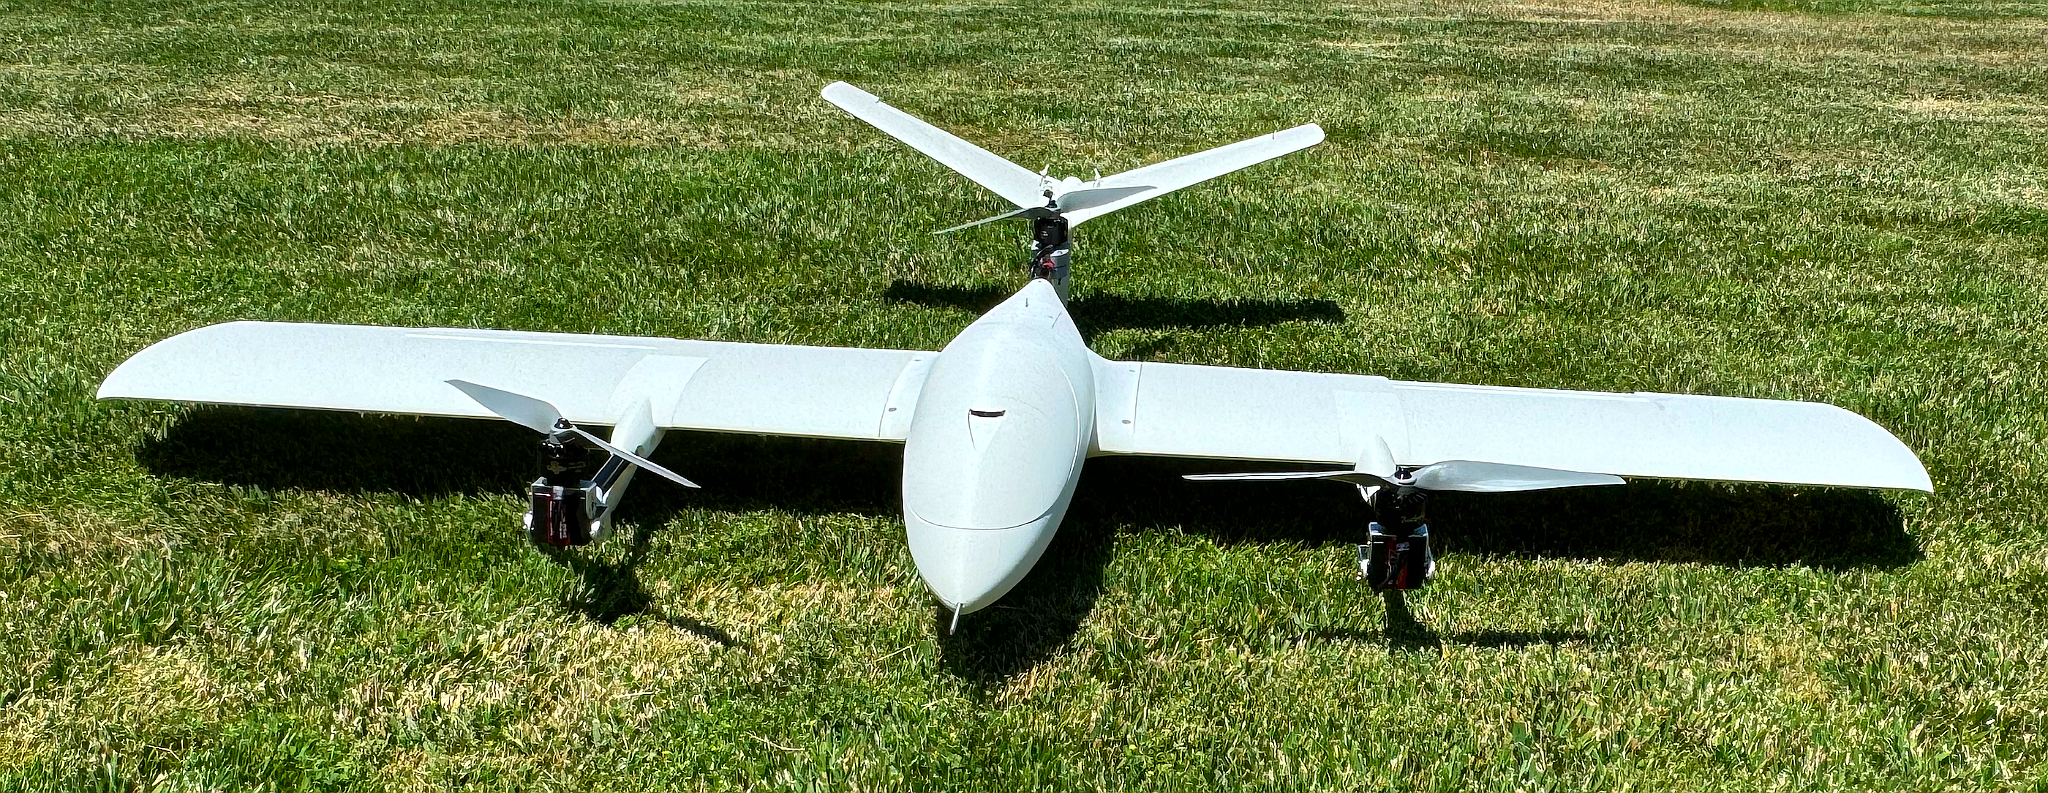
For my first 3D-printable project, I chose the Viper from Titan Dynamics. It’s a tilt tricopter VTOL airframe.
3D Printing
Printer Selection
Since I was starting from scratch, one of the first choices I had to make was selecting a 3D printer. I began with the Elegoo Neptune 4 Pro. This printer produced good-quality prints, but I found the process or transferring files - commonly known as “sneaker net” - to be tedious. I had to slice the model on my computer, save it to a USB drive, take the USB drive to the printer, and then select the file to print from the printer’s console. While the Neptune 4 Pro has an Ethernet port, the location of the printer made it inconvenient to run a cable.
I then switched to a Bambu P1S printer, which required much less setup and practically worked right out of the box. It has built-in Wi-Fi enabling me to print directly from my computer. Additionally, the built-in camera allows me to remotely monitor the progress of my prints.
Another key difference between the printers is the slicing software. Slicing is the process of converting the 3D model into instructions for the 3D printer. Ultimaker Cura is the recommend slicer for the Neptune 4, while Bambu studio is recommended for the Bambu P1S. Most slicing software is free to use, so I suggest downloading and experimenting with the slicer when selecting a printer. I also recommend choosing a slicer that supports the 3mf format, which allows you to store your model and all the print settings in a single file.
Printing
The printers I used were advertised with speeds up to 500 mm/s. While you might achieve something close to that with easy-to-print filaments like PLA, that won’t be your general experience, especially with more challenging materials. To save weight, LW-PLA (lightweight PLA) is a popular choice for printing drones; however, it is a difficult filament to work with. For good quality prints, I needed to reduce print speeds to 50 mm/s. Speed matters—at 50 mm/s, parts took on average 4 to 8 hours to print, and the longest piece, a section of the fuselage, took 22 hours. Given these long print times, the ability to remotely monitor the print job became invaluable. It took me about a week to print all the parts for the Titan Viper. Be aware that 3D printers can be noisy; since mine is located in my home office, I ended up printing parts overnight and on weekends to avoid interrupting my workdays.
The Titan Viper 3D models were well-designed, with most parts printable without the need for supports. The primary issue I encountered was bed adhesion. Tall and skinny parts like the rudder would occasionally fall over during printing. This problem was more prevalent with the Neptune 4 than with the Bambu P1S, likely because the Bambu P1S only moves the print head, while the Neptune 4 also moves the print bed back and forth during printing, which can cause more vibrations. When parts fell over, I would often find a ball of string instead of a completed print. A simple hack—using glue—resolved most of my bed adhesion issues. Glue also helped prevent warping when printing larger pieces.
Overall, I was not particularly impressed with the quality and durability of the LW-PLA prints. There was stringing, where web-like threads form on your prints. Adjusting retraction settings reduced stringing, but from my experience and what I’ve read, it’s nearly impossible to eliminate completely when printing with LW-PLA. Additionally, the LW-PLA parts didn’t feel very durable—I even damaged one part while installing electronics, which highlighted the material’s fragility.
Exploring the quirks and features of the slicing software was an interesting learning experience. For instance, with one slicer, if I didn’t explicitly specify printing the top and bottom walls, I ended up with prints that had open tops and bottoms. I also learned about infills and infill patterns. You can print solid parts with 100% infill, which would be the heaviest and most time-consuming to print. However, to save time and reduce weight, parts are typically only sparsely filled internally. I printed most of my parts with 3% to 4% infill, balancing strength with weight savings.
Assembly
With the parts printed, the fun begins with the assembly of the model. Assembly involved reinforcing certain components, like the wings, with carbon fiber rods and gluing everything together with CA glue (cyanoacrylate). The manual for the Titan Viper provided a comprehensive bill of materials, listing all the components needed to complete the build. This included suggestions for motors, electronics, sizes of required carbon fiber rods, and threaded inserts for screw joints.
In addition to the parts and materials, you’ll also need to invest in some essential tools, such as a soldering iron for connecting the electronics, a tool to cut the carbon fiber rods, like a Dremel or a small saw, and a heat gun for applying heat-shrink tubing to the wiring.
For the most part, the components fit together well, and the assembly instructions were easy to follow. However, when I encountered parts that didn’t fit snugly, it was usually due to slight warping of parts with longer edges. This is a common issue with 3D-printed parts, especially when dealing with larger pieces or certain types of filament like LW-PLA.
Electronics
Since my primary interest is in running autonomous missions, my electronics package differed from the suggestions in the manual for the Titan Viper. I selected the following components:
Flight Controller: I chose the Holybro Kakute, an affordable flight controller designed for fixed-wing aircraft. While it lacks redundant sensors, which would be desirable for higher-risk operations, it offers a good balance between cost and functionality for my needs.
Companion Computer: I used a Raspberry Pi 4, an onboard computer that will eventually control the drone. For now, it’s used to stream video from the Pi Camera and route telemetry from the drone’s flight controller to the ground control station (GCS). You can refer to my blog post on streaming video from the Raspberry Pi for more details. While this setup doesn’t offer low latency compared to something like the HDZero, it provides practically unlimited range, and the video is available for processing by the Raspberry Pi to enable autonomous actions.
Connectivity: For connectivity between my drone and the GCS, I used a 4G Dongle. This allows for reliable communication over long distances, which is essential for autonomous operations.
I’m still researching options for remote ID compliance.
Autopilot
For a tilt-tricopter build like the Titan Viper and for flying autonomous missions, I believe the best options for autopilots are ArduPilot or PX4. Both ArduPilot and PX4 are highly capable and can handle a wide variety of airframes. While PX4 has better integration with ROS (Robot Operating System), I chose to use ArduPilot because of its community support and documentation.
For ground control software, I prefer QGroundControl since I use a Mac. Mission Planner, the ground control software from the ArduPilot team, is primarily designed for Windows, though there are beta Mac builds available at the time of writing.
The ArduPilot documentation for setting up and tuning a tilt-tricopter was quite detailed and helpful, making it a significant resource in getting my drone configured and optimized.
Reflection
I learned a lot about 3D printing while building this drone. The flexibility that 3D printing offers is something I really enjoy. It’s almost magical to see a 3D model you design on your computer transformed into a physical object. However, one downside I encountered was the durability of the 3D-printed models. I’ve had some pretty hard landings with foam-based models and was able to continue flying without much issue. In contrast, similar landings with this 3D-printed airframe required me to reprint and rebuild components.
It’s a tradeoff between weight, durability, and printing speed. After experimenting with different materials, I’ve come to prefer durability and printing speed over the slight weight savings offered by LW-PLA. For me, the higher durability and printing speed of regular PLA outweighs the benefits of using LW-PLA, so I now print most of my components in PLA.
In conclusion, 3D printing a drone offers great flexibility and learning opportunities, but it comes with its own set of challenges. Proper research, patience, and a willingness to experiment are key to success in this endeavor.